
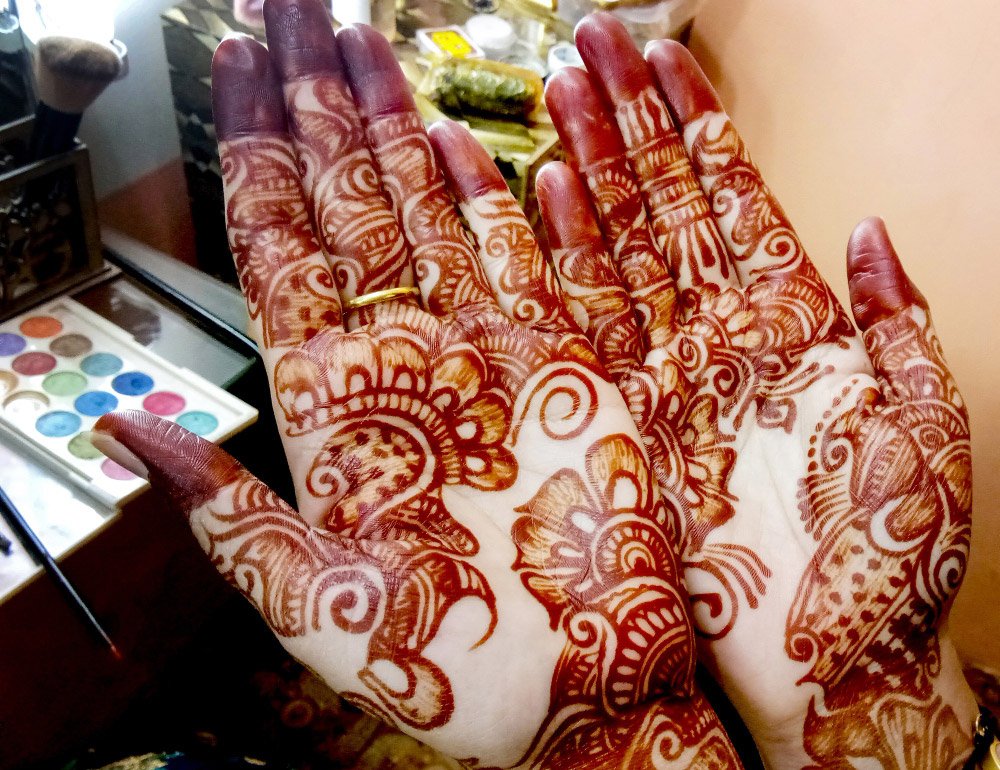
Are you a big fan of beautiful mehendi designs, also known as henna? Have you ever marveled at the lovely patterns and thought, “I wish I could make this at home?” If so, then you’re in for a treat! This guide is like your personal GPS to navigate the process of making homemade mehendi. From the comforting aroma of henna leaves to the joy of seeing beautifully designed hands, making mehendi at home can be a rewarding and enjoyable experience.
Spotlights:
- Benefits of Making Mehendi at Home
- Step-by-Step Guide to Making Mehendi at Home
- Tips for a Long-Lasting and Vibrant Mehendi
Getting Started with Mehendi
The first step is knowing and gathering all the necessary supplies for this exciting and artistic journey.
Gathering the Necessary Supplies
To create your DIY mehendi, you’ll need some crucial items, including:
- Fresh Henna powder
- Essential oil
- Sugar
- Lemon Juice
- Mehendi Applicator (you can use a toothpick, or squeeze bottle)
- Plastic Wrap (to seal the design while waiting for it to dry)
These simple tools and ingredients will prepare you to start your mehendi creation at home.
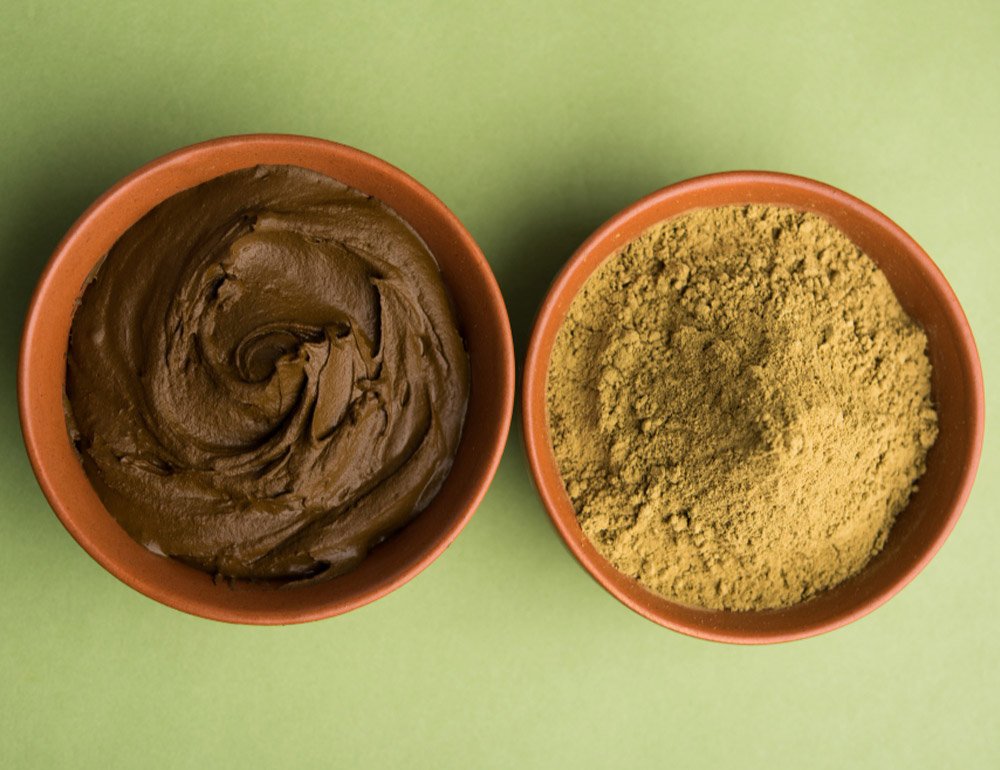
Preparing the Mehendi Paste at Home Using Natural Ingredients
The recipe for making mehendi at home is quite simple. Use two tablespoons of henna powder, one tablespoon of sugar, and enough lemon juice to create a smooth paste. Then, add a few drops of essential oil for a pleasant scent and to help the color darken.
Remember that the paste should be thick enough to adhere to your skin without running but fluid enough to flow through the applicator. Once you’ve made your paste, let it sit for a few hours or overnight to allow the dye to release from the henna.
With your tools collected and your paste ready, you are set to start designing your very own homemade, natural, and rigorous mehendi designs.
Basic Mehendi Designs for Beginners
It’s essential to familiarize ourselves with some beginner-friendly mehendi designs. Mehendi designs can range from simple to complex. However, for newcomers in mehendi art, it’s best to start simple and gradually explore complex designs.
Exploring Simple and Easy Mehendi Designs
Here are a few easy and simple designs to get you started:
- Dots and Lines: This is one of the most basic design patterns in mehendi art. Simply practice creating dots and lines and play around with spacing and size. You can make designs that have a geometric appeal or freestyle according to your preference.
- Flowers and Leaves: Floral patterns are essential to mehendi art. You can never go wrong with a daisy or a rose pattern. Start by learning how to trace petals and leaves.
- Paisleys: This droplet-shaped design is a classic in mehendi art. It is an effortless design that will surely add some sophistication to your mehendi skills.
Benefits of Making Mehendi at Home
- Avoiding Chemical-Infused Henna
- Cost-Effective Solution
- Personalized and Customizable
- Ensuring Skin-Friendly Ingredients
Avoiding Chemical-Infused Henna:
Making Mehendi at home allows you to have better control over the ingredients. By using natural substances like pure henna, you can steer clear of chemical additives or harmful components that might be present in commercially prepared henna.
Cost-Effective Solution:
Homemade Mehendi can be a budget-friendly option. Buying the raw materials needed for the paste often turns out to be more economical than purchasing pre-made cones or going to a salon for application.
Personalized and Customizable:
When you prepare Mehendi at home, you have the freedom to tailor it to your preferences. You can adjust the consistency, experiment with designs, or even mix in additional natural elements to create a unique blend.
Ensuring Skin-Friendly Ingredients:
Creating Mehendi at home lets you ensure that only skin-friendly ingredients are used. You can carefully select and mix substances that suit your skin type, avoiding any potential adverse reactions or allergies commonly associated with store-bought options.
Step-by-Step Guide to Making Mehendi at Home
Step 1: Choosing the Right Henna Powder
To start making mehendi at home, the first step is to choose the right henna powder. Opt for a high-quality green henna powder instead of the chemical-infused black variety. Green henna powder is derived from the powdered leaves of the Old World shrub and is completely natural. It is easily available in local stores and is not expensive.
Step 2: Adding Sugar for Moisture Retention
After obtaining the henna powder, sift it through a muslin cloth into a glass bowl. This will ensure a smooth and fine texture. To help the paste retain its moisture, add 2 tablespoons of granulated white sugar to the sifted henna. The sugar acts as a humectant, preventing the paste from drying out too quickly and allowing for better adherence to the skin.
Step 3: Using Lemon Juice for Enhanced Color
While water can be used to make the henna paste, using lemon juice instead is highly recommended. Lemon juice, being acidic, helps release the dye from the henna, resulting in a more vibrant and long-lasting color after application. Add enough lemon juice to achieve the desired consistency of the paste.
Step 4: Incorporating Essential Oils for Fragrance and Moisturization
To enhance the fragrance of the mehendi and moisturize the skin, add a teaspoon of essential oil of your choice to the henna paste. Essential oils like lavender or tea tree oil work well and provide a pleasant aroma. Additionally, the moisturizing properties of the essential oils help prevent the henna from drying out and irritating the skin during the application process.
Step 5: Allowing the Paste to Rest for Optimal Staining
Once all the ingredients are mixed, cover the bowl with a plastic wrap and set it aside for 4-6 hours. This resting period allows the dye in the henna to release fully, resulting in better staining of the skin. The longer the paste rests, the deeper the color will be.
Step 6: Testing the Henna Paste
Before applying the mehendi, it’s important to test the henna paste to ensure its readiness. Put a drop of the paste on your hand and wipe it off after a few minutes. If it leaves an orange stain, the henna is ready to be used. If not, allow the paste to rest for a little longer and test it again.
Step 7: Applying Mehendi Designs
Once the henna paste is ready, transfer it to a cone or a henna applicator for easy and precise application. Start by cleaning and drying your hands thoroughly. Then, use the cone to create intricate designs on your palms, fingers, and even on the feet if desired. Allow the mehendi to dry completely, which usually takes 2-3 hours, before gently scraping off the dried paste to reveal the beautiful stained patterns.
Mehendi Recipes for Different Occasions
Mehendi, also known as henna, is more than just body art. It holds cultural and traditional significance in many parts of the world. Its beautiful dark, reddish pigment that lasts for days is a favorite among women and children, especially during weddings, festivals, and informal gatherings. Here, we bring you three different DIY mehendi recipes for various occasions.
Mehendi Recipe for Weddings and Festivals
This is an extra dark, long-lasting recipe perfect for brides and ladies who want their mehendi to pop during festive events.
- Start with 2 tablespoons of pure henna powder
- Add 1.5 teaspoons of sugar (Giving a darker color)
- Blend in lemon juice until you get a yoghurt consistency
- Add a few drops of eucalyptus oil and allow the mixture to sit overnight
Mehendi Recipe for Casual Occasions
Just want to adorn your palms casually? Here’s a lighter, fuss-free recipe.
- Mix 2 tablespoons of henna powder with warm water until it becomes a smooth paste.
- Add a teaspoon of fresh lime juice and a few drops of lavender essential oil
- Let it rest for 2-3 hours before application.
Mehendi Recipe for Kids
Kids love getting their hands painted too! But their skin can be more sensitive, so it’s best to keep it simple and natural.
- Combine 2 tablespoons of henna powder with warm water to form a smooth paste.
- Add a few drops of natural coconut oil for a gentler formulation.
- Let the mixture stand for about an hour before applying to ensure it’s gentle enough for their sensitive skin.
Remember that the key to any successful DIY project is patience and practice. Enjoy experimenting with these mehendi recipes and add a personal touch to your festivities!
Tips for Long-lasting Mehendi Designs

Mehendi, or henna as it’s known globally, is an age-old beauty tradition known for its natural, artistic flair and primal simplicity. However, getting the desired dark hue and ensuring its longevity can be a tad tricky. Here are some tried and tested ways to make your mehendi color dark and make it last longer.
Techniques to make the Mehendi Color Dark and Long-lasting
When making your homemade mehendi, a couple of natural hacks can enhance the color significantly. Here they are:
- Lemon and sugar solution: Rub a mix of sugar and lemon juice over the dried mehendi. This traps the heat, helping enhance color quality.
- Clove steam: Steaming your hands over a pan of cloves also darkens the henna; the oil from the cloves seeps into the mehendi, helping it stain more effectively.
- Leave it overnight: The longer the henna paste is left on your skin, the darker the stain. Ideally, try and leave it on overnight.
Care Tips to Preserve the Mehendi Design
To keep your mehendi design fresh and intact for a longer period, follow these simple care tips:
- Avoid water: Try not to wash your hands for at least 6-8 hours after removing the paste.
- Use mustard oil: Rubbing mustard oil post mehendi application helps deepen the color and increases its longevity.
- Don’t use soap: Until necessary, avoid using soap directly on the mehendi; this prevents the design from fading away quickly.
Remember, the secret of long-lasting, beautifully dark mehendi is patience and extra care. Happy Henna-ing!
Tips for a Long-Lasting and Vibrant Mehendi
- Keep the mehendi paste on for at least 6-8 hours to allow for optimal staining.
- Avoid contact with water or any liquid during the drying process.
- Apply a mixture of lemon juice and sugar on the dried mehendi to seal the color and enhance its longevity.
- Avoid excessive washing or scrubbing of the mehendi area for the first 24 hours.
- Apply a thin layer of olive oil or coconut oil on the dried mehendi to keep it moisturized and prevent it from cracking.
Frequently Asked Questions
1. Do’s and Dont’s for applying Mehendi
When it comes to DIY Mehendi, a few tricks of the trade can help ensure beautiful results.
Do’s:
Remember to wash your hands properly before applying henna. This allows the mehendi to adhere better to your skin.
Leave the mehendi on as long as possible, ideally overnight, to achieve a darker color.
Keep your skin moisturized with natural oils, like coconut or olive oil, post-application.
Don’ts:
Avoid washing the mehendi area with water for at least 12 hours post-application.
Steer clear of synthetic color-enhancing products as they can be harmful to the skin.
2. Can I store leftover henna paste for future use?
Yes, you can store leftover henna paste in an airtight container in the freezer for up to 3 months. Just thaw it before using it again.
3. Can I apply homemade mehendi on other parts of the body besides hands and feet?
Yes, you can apply homemade mehendi on other parts of the body like the arms, and back, or even create temporary tattoos. Just ensure that the ingredients used are safe for the specific area of application.